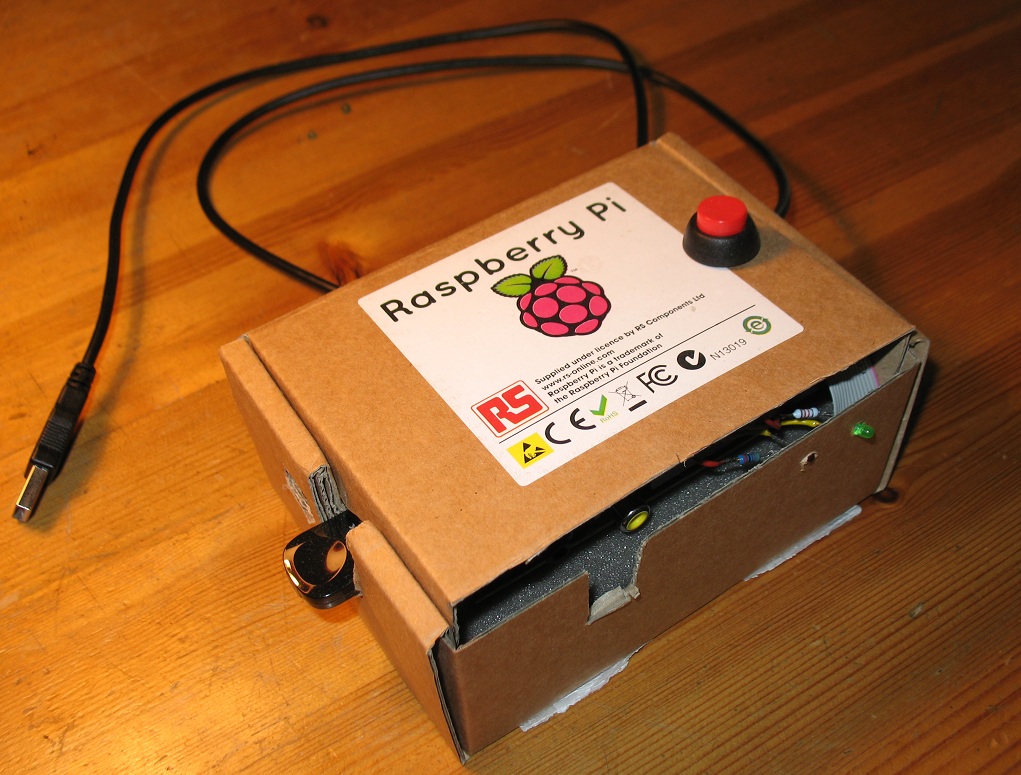
Here's how I built an internet radio from a Raspberry Pi, an old flat-ribbon hard disk cable, a toggle-switch, two resistors, two LEDs, and a soldering iron.
The case above is just the cardboard box that RS components ships the Pi in. It turned out to be a natural fit for all the components I needed.
Note: This project was done back around 2012, but most of what you see should still be applicable.
FM radio will be history at some point and some broadcasts are already now digital-only. Unfortunately, over-the-air DAB radio is not an option where I live - tried it, and there is just no signal right here. Radio over internet is however not a problem.
So I used a tablet for listening to internet radio for a while, but it was just too much bother: You have to turn it on, you have to unlock it, you have to start the radio app, and the app has to be clicked to select the station. What I dreamed about was something as simple as a physical FM radio: You turn it on and it starts playing by itself. Switching to another radio station should be a simple press of a single button.
In short, I needed something that I could actually program - the Pi is great for that - and if I could also hook up some simple hardware to control it, it would be perfect. The Pi has a fairly large set of I/O pins that you can hook directly up to switches and LEDs. This makes it straight-forward to build an appliance that has a user interface that is as simple as a car radio. Combined with a WiFi dongle, the Pi should be perfect, shouldn't it ?
I installed Debian Wheezy and used that default configuration as my starting point.
I purchased a D-Link Wireless N Nano USB adapter, DWA-131, which is supported out-of-the-box on the Pi in Debian Wheezy.
To get WiFi configured for a start, change /etc/network/interfaces to this:
root@raspberrypi:/etc/network# chmod 0600 interfaces
root@raspberrypi:/etc/network# cat interfaces
auto lo

iface lo inet loopback
iface eth0 inet dhcp

auto wlan0
iface wlan0 inet dhcp
	wpa-ssid        my-network-name
	wpa-psk         ********

root@raspberrypi:/etc/network#
It seems like the most reliable setup is to boot with Wireless net only. If I boot with both wired and wireless and then unplug the wired network, my routing is off - I can ssh to the Pi but the Pi cannot connect out (?). Well, the wireless-only setup is all I'll ever use anyway.
The above configuration worked fine as a start. However, I kept losing connection after about three hours. In the router log I could see that the Pi was re-connecting and getting stuck being authenticated on the wireless network. That problem went away by using a static IP address. This may be a problem with my particular router, but this is at least something to try if DHCP isn't reliable for you. This is the configuration I ended up using (my router/access point is 192.168.0.1):
iface wlan0 inet static
	wpa-ssid        my-network-name
	wpa-psk         *********
	address 192.168.0.20
	netmask 255.255.255.0
	gateway 192.168.0.1
	dns-nameservers <name-server1 IP> <name-server 2 IP>
I installed the VLC media player (though, see update below):
apt-get install vlc
When I first tried it, vlc would complain about "alsa audio output error: cannot commit hardware parameters: Invalid argument". Apparently the driver doesn't report capabilities correctly - or the 'plug' device does not resample as expected, according to this post: http://www.raspberrypi.org/phpBB3/viewtopic.php?t=7107&p=121986.
The solution is to create a ~/.asoundrc file like below.
pi@raspberrypi ~ $ cat .asoundrc
pcm.!default {
		type hw
		card 0
}

ctl.!default {
		type hw
		card 0
}
pi@raspberrypi ~ $
Now, to play Radio Denmark, Program 1, I can just run the following console command - note: No need for a graphical login since I ask VLC to use its "dummy" interface with the -I dummy option. The URL was found at Radio Denmark's site dr.dk
vlc http://live-icy.gss.dr.dk:8000/A/A03H.mp3.m3u -I dummy
When VLC plays a radio station it uses about 25% CPU. Surprisingly heavy, but not actually worrying.
Update 2015-01-10:I have now switched to playing streams with mpc/mpd. CPU usage has dropped to about 9% when playing with mpc. Thanks to Claus Holmelin H°yer for the tip about using mpc/mpd instead :-).
To install mpc:
apt-get install mpc mpd
To start playing a stream with mpc I do this:
mpc loadmpc play 1 # Plays one of the loaded streams. First stream loaded above is number 1. mpc volume 100
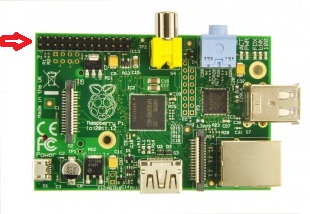
Now, for the most fun part: Hooking up hardware! The Pi's GPIO pins are accessible via a 26-pin connector.

Image copied and slightly modified from http://elinux.org/RPi_Hub.
The elinux.org site shows the pinout of the GPIO connector.One of my friends gave me an old IDE 40-pin ribbon cable. It fits the GPIO connectors nicely. The remaining 14 unused pins makes the cable stick out a bit but it is no worse than the SD card which also sticks out from the main board.
GPIO pins 0 and 1 are default configured for input with pull-up resistors so they are ideal for connecting switches. I used a big red toggle-switch that I had lying around. As a matter of fact, using a toggle-switch also simplifies programming because detecting that the button was pressed is now a question of comparing current state with a previous state - there is no timing window involved.
The first easily-configurable output pin is GPIO 4 on pin 7, so I used that for connecting to a red LED. A green LED will be connected to pin 1 (+3.3V) on the GPIO connector to show that the Pi is turned on.
The wiring diagram is then:
    GND	       pin 6
    GPIO0      pin 3    Through toggle switch to GND.
    GPIO4      pin 7    Red LED, 510 ohm, draws 3.1 mA (1.6V drop over resistor).
    +3.3V      pin 1    Green LED, 1200 ohm, draws 1.1 mA (1.4V drop over resistor).


	pin

	 1  -------------> + Green LED --- 1200 ohm --+
	                                              |
	 2  x                                         |
	                                              |
	 3  -------------> Toggle switch ---------+   |
	                                          |   |
	 4  x                                     |   |
	                                          |   |
	 5  x                                     |   |
	                                          |   |
	 6  -------------> GND <------------------+-+-+
	                                            |
	 7  -------------> + Red LED -- 510 ohm ----+
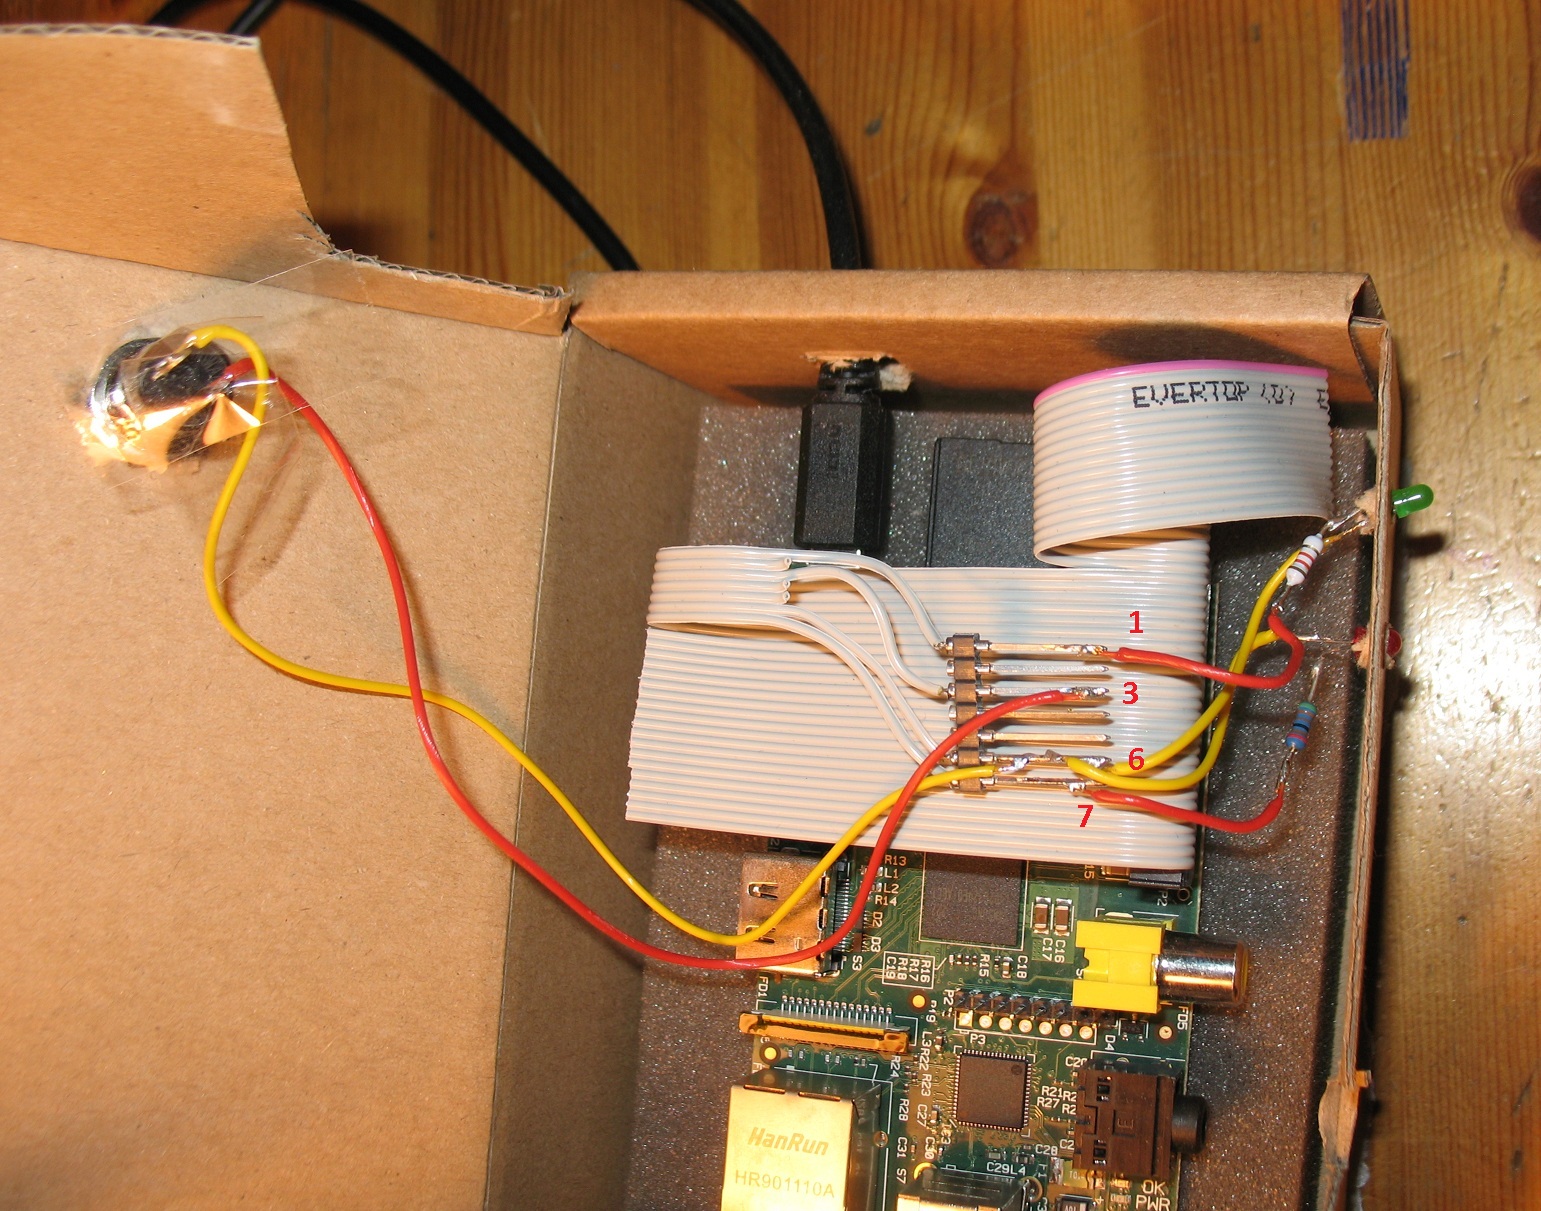
And this is what it looks like in real life (all the yellow wires are connected to pin 6, red wires go to pins 1, 3, and 7):

I have decided to use the simple way of reading and setting the pins - by reading and writing to device files in /sys/class/gpio/. To do that you first need device files for each GPIO pin that you want to access. Device files are created for a GPIO pin by exporting the pin like this:
echo "4" > /sys/class/gpio/export
echo "out" > /sys/class/gpio/gpio4/direction
The first command tells the GPIO driver to create device files for GPIO 4. The directory /sys/class/gpio/gpio4/ now exists and you can then configure the pin to be an output pin, as I do with the second command, writing to the direction device file. There is a corresponding value device file that shows or sets the pin state; "0" or "1". Very simple to use, and you can even experiment with it from the command line.
I created a startup script /etc/init.d/init-gpio that initializes the GPIO pins on boot and set it up as a boot service.
root@pi-radio:/etc/init.d# cat init-gpio
#! /bin/sh
### BEGIN INIT INFO
# Provides:          GPIO pin initialization
# Required-Start:    $local_fs
# Required-Stop:
# Default-Start:     2 3 4 5
# Default-Stop:      0 1 6
# Short-Description: GPIO init
# Description:       GPIO pin initialization for the Pi Radio appliance.
### END INIT INFO

#
# Author: Jan Holst Jensen.
#

NAME="init-gpio"
SCRIPTNAME=/etc/init.d/$NAME

# Define LSB log_* functions.
. /lib/lsb/init-functions

case "$1" in
  start)
        log_daemon_msg "GPIO init"
        # Initialize GPIO pins and start blinking the red LED so we can tell that
        # the Pi has begun starting services.

        # Enable GPIO 0 (input per default) and 4 (set as output pin).
        echo "0" > /sys/class/gpio/export

        echo "4" > /sys/class/gpio/export
        echo "out" > /sys/class/gpio/gpio4/direction

        # Start red LED on GPIO4 blinking. Once all systems are up and the radio starts,
        # the 'do_blink' file will be removed and this will cause the 'blink_led' script
        # to exit.
        touch /home/pi/do_blink
        /home/pi/blink_led.sh &

        log_end_msg 0

        ;;
  stop|stop|restart|force-reload|status)
        log_daemon_msg "Only 'start' will do anything"
        log_end_msg 0
        ;;
  *)
        echo "Usage: $SCRIPTNAME {start|stop|restart|force-reload|status}" >&2
        exit 3
        ;;

esac
root@pi-radio:/etc/init.d#

root@pi-radio:/etc/init.d# chmod +x init-gpio
root@pi-radio:/etc/init.d# update-rc.d -n init-gpio defaults
update-rc.d: using dependency based boot sequencing
insserv: enable service ../init.d/init-gpio -> /etc/init.d/../rc0.d/K01init-gpio
insserv: enable service ../init.d/init-gpio -> /etc/init.d/../rc1.d/K01init-gpio
insserv: enable service ../init.d/init-gpio -> /etc/init.d/../rc2.d/S01init-gpio
insserv: enable service ../init.d/init-gpio -> /etc/init.d/../rc3.d/S01init-gpio
insserv: enable service ../init.d/init-gpio -> /etc/init.d/../rc4.d/S01init-gpio
insserv: enable service ../init.d/init-gpio -> /etc/init.d/../rc5.d/S01init-gpio
insserv: enable service ../init.d/init-gpio -> /etc/init.d/../rc6.d/K01init-gpio
insserv: dryrun, not creating .depend.boot, .depend.start, and .depend.stop
root@pi-radio:/etc/init.d# update-rc.d init-gpio defaults
update-rc.d: using dependency based boot sequencing
root@pi-radio:/etc/init.d#
The blink_led.sh script that the init-gpio script references is the following:
pi@raspberrypi ~ $ cat blink_led.sh
#!/bin/bash

while [ -f /home/pi/do_blink ]
do
  echo "1" > /sys/class/gpio/gpio4/value
  sleep 0.5
  echo "0" > /sys/class/gpio/gpio4/value
  sleep 0.5
done
pi@raspberrypi ~ $
It flashes the red LED as long as the file /home/pi/do_blink exists.
The program that lets us control the radio via the push button is a small Python script that is started up on each boot. It has a configurable list of radio channels (the channels list) that you can walk through by pushing the big red button (the toggle-switch connected to GPIO 0). Every time you push the button the program stops the currently playing channel (the radio_process - a handle to a VLC process), plays a channel-specific signature so you can hear which channel is coming up, and then restarts VLC with the new stream.
The program is /home/pi/radio.py :
import time
import subprocess

channels = [\
        ("P1.wav", "http://live-icy.gss.dr.dk:8000/A/A03H.mp3.m3u"), \
        ("P2.wav", "http://live-icy.gss.dr.dk:8000/A/A04H.mp3.m3u") \
        ]

def get_switch_value():
        f = open("/sys/class/gpio/gpio0/value")
        value = f.read()
        f.close()

        return value[0:1]

def play_channel(idx):
        global radio_process
        if radio_process <> None:
                radio_process.terminate()

        channel_signature = channels[idx][0]
        url = channels[idx][1]

        subprocess.call(["/usr/bin/aplay", "/home/pi/" + channel_signature])
        radio_process = subprocess.Popen(["/usr/bin/vlc", url, "-I", "dummy"])

####

radio_process = None
channel_index = 0
play_channel(channel_index)

latest_switch_value = get_switch_value()

try:
        while True:
                v = get_switch_value()
                # Button pressed: Switch to next channel.
                if v <> latest_switch_value:
                        print "Button pressed."
                        latest_switch_value = v

                        channel_index = channel_index + 1
                        if channel_index >= len(channels):
                                channel_index = 0
                        play_channel(channel_index)

                # Poll interval.
                time.sleep(0.1)
except:
        # Keyboard interrupt or other stuff that causes termination -
        # clean up any running child process.
        if radio_process <> None:
                radio_process.terminate()
The Python radio software is started up on boot by adding this to /etc/rc.local, right before the last exit 0 line.
# Start the radio.
su -c "python radio.py &" - pi
# Remove the 'do_blink' file to stop the red LED from
# blinking: boot is complete.
rm /home/pi/do_blink
And that's it. Turn the Pi on and it starts playing radio. Push the button and it switches to the next channel in the list. Easy and convenient.
And, being a nerd, I really like that I can ssh into my radio :-).
The Pi works great as an internet radio, but of course it could be even better. Things that I would like to improve:
Boot time: If I started the Python script as a service that depends on networking it might shave a couple of seconds off since it could then start as soon as the network is up. However, the network doesn't initialize until 30-35 seconds after boot. So more dramatic speedups may require a custom kernel (?) - or perhaps just tweaking of the init scripts (?).
Multiple sounds playing: If I try to play the channel signature in a background process so I can restart VLC while the signature plays, VLC typically won't be able to open the audio output when it gets around to it because the audio device is still in use by aplay. It may simply be a matter of configuring my .asoundrc differently to allow mixing.
LED blink: If I could get the red LED to blink as soon as the kernel is live so it shows that the Pi is booting it would be nice. Currently it only blinks for about 10 seconds at the end of startup.
Comments and suggestions are welcome. Contact: Jan Holst Jensen,